

A nasty rite of passage for all boys is learning to fry insects with a magnifying glass by concentrating sunlight through the lens. This summer, I handed down the heritage to my children with the inclusion of igniting magnesium particles, roasting marshmallows, and cooking cherry tomatoes from our garden using beams of light. Desperate to demonstrate a more practical application, I wondered whether it was possible to solder electronics using this form of solar power.
Yes! Solar soldering is possible with a large-enough burning lens, the correct setup, clear sunny skies, and some patience.
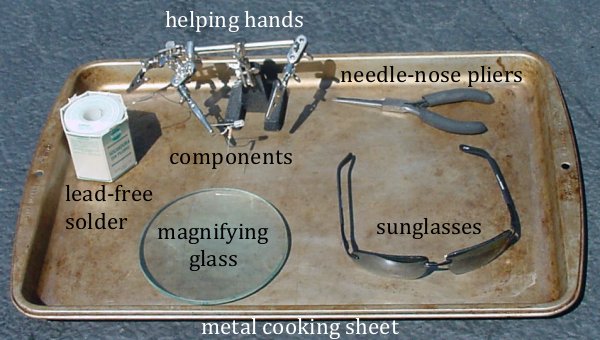
Example setup for soldering with a magnifying glass.
My set-up includes:
Soldering requires considerable energy because solder melts at over 400 degrees Fahrenheit and the metal in the electronics quickly conducts away heat. Therefore, a large amount of sunlight needs to be concentrated in a small area for a long enough period to raise the joint above the melting temperature.

A 5-inch glass lens in a common magnifying desk lamp.
For this experiment, I selected a five-inch diameter biconvex lens taken from a magnifying desk lamp. These types of desk lamps can be found at almost any office supply store for under $100. The lens is usually held in place with a removable snap-on ring.
The greater the lens’s surface area, the greater the potential maximum solar power that can be delivered. The magnification of the lens determines the distance at which the light rays converge (the focal point), not the amount of energy or the size of the focal point. The actual minimum size of the focal point is determined by the quality of the lens (aberrations or distortions).
Since the desk lamp contains a large, cheap lens, the quality is not expected to be very good. On average, the smallest-size focal point I could achieve was about 1/4 of an inch in diameter.
If you’ve ever left a dark object outside on a sunny day, you know how hot it can become. Imagine concentrating the energy from a 5-inch diameter area into a 1/4-inch (0.25-inch) diameter area.
			area of a circle = (diameter2 × π)/4

			area of a magnifying glass = (52π)/4 = 19.6 square inches

			area of a focal point = (0.252π)/4 = 0.05 square inches

			increase in energy = 19.6/0.05 = 392 times
Of course, glass absorbs some ultraviolet and isn’t 100% transmissive to visible and infrared, but you get the idea.
Certainly the center of the 1/4-inch focal point will have the most intense amount of solar radiation. A better quality lens would further concentrate the energy, which would permit soldering smaller, fine-pitched circuitry. At some diameter, a stand may be necessary to keep the focal point targeted in one spot, rather than jumping around burning everything.
How and when you use the magnifying glass is even more important than the size of the lens.

Left: Multiple supportive factors result in maximum heat delivery. Right: Fail!
The factors that determine the amount power are:
Before trying to solder parts, try practicing on a metal or stone surface until you learn how to create the smallest rounded point with the magnifying glass.
| Distance Good | Distance Bad | |
| Angle Good |  |
 |
| Angle Bad |  |
 |
Proper manual soldering with a soldering iron requires that the leads of the parts are heated up, and then the solder wire is touched against the leads to melt and wick into the joint. A weak solder joints occur when a person heats the solder directly with the soldering iron, since the rosin will then clean the soldering iron not the joint, and the solder will then coat the joint instead of penetrating it.
In solar soldering, there is no contact with a foreign metal (soldering iron tip) and the heat source is fairly non-specific (heating an area as large as 1/4 inch). Therefore, it seems acceptable to wrap the leads and the solder wire together and heat up the entire joint simultaneously.
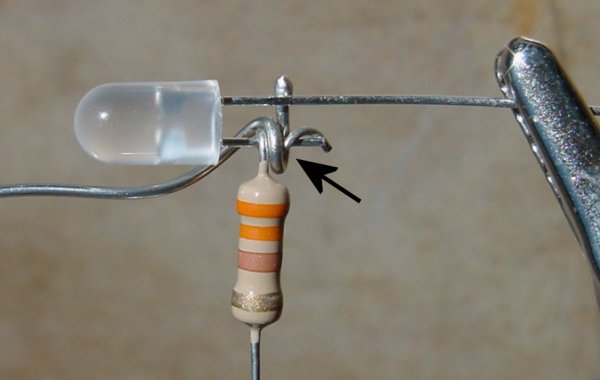
Solder wrapped around intertwined component leads.
To connect a resistor to an LED, the LED and resistor leads are first shortened with snips. Then the leads and solder wire are wrapped around each other with pliers.
Here’s the video:
Hopefully the smoke is coming from the rosin, not the components.
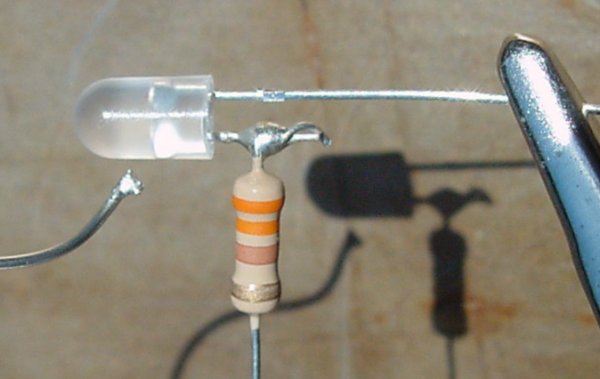
Solder joint formed by solar power.
After fiddling with the lens distance and angle, it took less than 30 seconds to solder this joint. (5 inch lens, 12:30 PM August 31 in Chicago, IL)
Notice above that the solder wire connected to the main spool has melted free. It would have been better if I had cut off the excess solder wire before soldering, as that transported away some of the thermal energy.

Solar-soldered joint close up. No touch ups.
The joint is surprisingly good for such a goofy method. The LED works fine.
Theoretically, if you find yourself in a post-apocalyptic world or perhaps in a remote location after a plane crash, and the only way of surviving is to repair a piece of electronic equipment, then you can scrape off some solder from an unnecessary piece and solder parts together using a steady hand and a pair of eyeglasses.
Given a series of lenses and a lot of patience, you might even be able to perform some solar welding. Perhaps not on aluminum or a large steel I-beam, but perhaps on sheet metal or black plastic.
More realistically, it might be a fun challenge to solder together a solar robot using solar energy. The ants thank you.