

On the previous page, I selected a Pelican 1050 Micro Case as an outdoor enclosure for the backyard weather station. This box seals against water, bugs, and dust. Unfortunately, I was going to have to break the seal in order to run wires from the circuit board to the outside temperature sensors.
This page presents two ways of modifying the project box: the easy way and the semi-professional way.
In Chapter 17 of Robot Building for Beginners, I recommend poster tack mounting putty as a quick way to attach a timing disc to a motor to measure RPM using a tachometer or wall clock. I’m embarrassed to suggest that the first approach to sealing the area around where the wires exit the project box will be to use poster compound, modeling clay, or plumber’s putty.
First, whip out your favorite rotary tool and insert a grinding stone. Yes, we’re going to ruin the box!
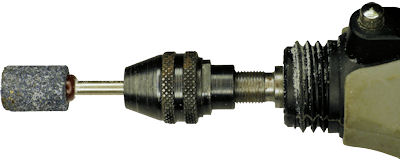
Dremel rotary tool with grinding stone attachment.
Next, select a suitable area on the case for the wires to exit. Instead of drilling a hole large enough for the Molex connectors on multiple wires, grind down the lip on the bottom half of the container. I selected a corner near the hinge at the back.
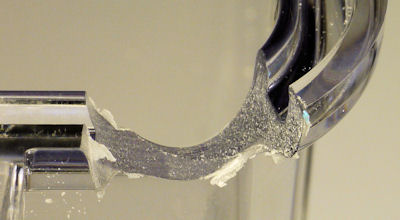
Ground away corner of clear plastic case.
The Pelican plastic ground down quite smoothly. It sure cuts like polycarbonate, even though a certificate on the website lists ABS as a material. Make brief contact, followed by a cooling period, so that the plastic grinds away rather than melts.
Try to remove only the minimal amount of material necessary, to avoid having to use the squishy poster tack as more than a narrow gap filler. I removed only about 7 millimeters at the deepest part of the cut.
By removing material at the lip instead of drilling a hole straight through the side, the rubber liner can stay intact. The liner is pushed down slightly when the box closes, but it doesn’t interfere or harm anything.

Poster tack to seal box corner where wires pass through.
Wrap a small piece of the poster tack around the wires where the gap in the lip was made. Then, after inserting the wires and closing the box, apply additional poster tack or other water resistant sticky material around the outside.
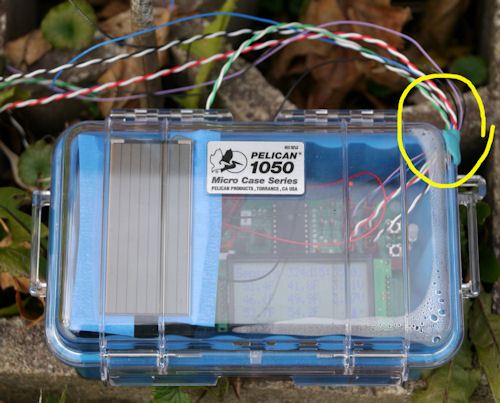
Frost depth weather station in Pelican micro case.
Believe it or not, the material works well. Despite rain, snow, and freezing temperatures, the poster tack stays in place and the box remains sealed.
Even so, using a tacky substance on an expensive professional case seems amateurish and somewhat defeats the point of a nice sealed box. From a practical perspective, the poster tack needs to be reapplied each time the case is open and closed.
This idea isn’t mine -- I read it somewhere in the last year but have since lost track of the article. Someone came up with the cool idea of using PVC pipe as a wire connection case or conduit. Check it out:

PVC tube sealed with epoxy.
A short length of 1/2 inch diameter schedule 40 PVC pipe from a local hardware store is epoxied to a hole in the Pelican case. A hole is drilled in a PVC end cap and the wires are brought into the case. The cap is pushed onto the end of the pipe (but not glued!) and the wires are epoxied at the end of the cap. This seals the tube and holds the wires in place.
To remove the wires, disconnect them from the circuit board inside the case (presumably you use Molex connectors or something similar). Loosen and pull off the end cap, since it is not adhered to the PVC tube. The wires will come out of the project case, but still be attached to the end cap. You can now bring the project box inside for servicing -- or whatever.
I couldn’t find an exact drill size for outer diameter of the PVC pipe, which is listed as 0.84 inches.
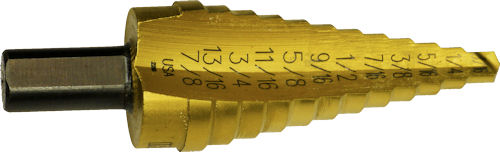
Multistep drill.
So, instead, I used a step drill until reaching the 13/16-inch mark (0.8125 inches). I then used some fine sandpaper to enlarge the hole until the pipe fit snugly.
If you don’t have a hole saw, then it is easier to drill a large hole by drilling a smaller hole and enlarging it with a succession of larger drill bits. The advantage of the multistep drill is that it enlarges the hole without needing to swap drill sizes along the way. Furthermore, the shape of the drill works really well in this type of plastic, as opposed to a classic spiral drill which tends to draw itself into the material and jam.
To finish the project box, the circuit board needs to be attached to the case to prevent it from sliding around. To avoid drilling additional holes, I took advantage of a unique element of the Pelican case...