

(article continued from previous page)
To see how a rotary encoder works, I sacrificed one to a milling machine. The previous page showed how the detents make a clicking noise and hold the encoder shaft in place. But, what does the output look like and how is it generated?
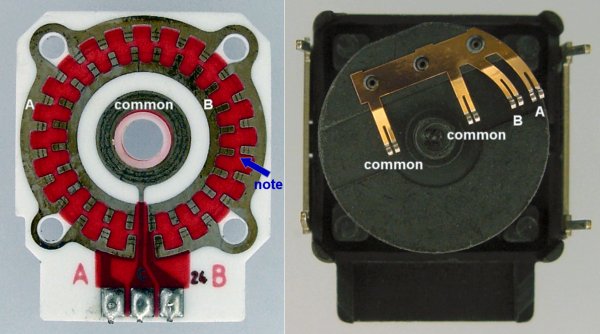
Inside a mechanical rotary encoder showing the PCB and brushes.
Inside of the rotary encoder is a printed circuit board with three tracks. In this case, the outer track is electrically connected to the first pin - A. The next track is electrically connected to the third pin - B. And the innermost track is connected to the middle pin - common.
The two outermost tracks have teeth (or terminals) that cause the signals to turn on and off as the shaft is turned. Note that the teeth on the A and B tracks are never exactly aligned. Instead they overlap radially by half (they are out-of-phase).
Above the PCB, a set of metal brushes are affixed to the shaft. Two of the brushes rub against the common track. I suppose two brushes are used on common to make sure it has a solid connection.
For this example, I’m going to pretend that common is connected to 5 V such that the switches turn on when the brushes make contact with the teeth. In reality, the opposite usually occurs. Usually common is connected to ground and pull-up resistors bring the signal up to 5 V when the brushes don’t make contact with the teeth. But, that can be confusing in an example.
Oscilloscope trace showing rotary encoder switches turning off and on. Output A is on the top. Output B is on the bottom.
As the rotary encoder shaft is turned counterclockwise, sometimes both the A and B brushes will touch teeth on the A and B tracks, respectively. Thus the outputs of A and B are connected to common and the output signal appears as two switches turned on (the far left side of the above oscilloscope trace).
As the rotary encoder shaft is turned further, the A brush still touches a tooth on the A track, but the B brush no longer touches a tooth on the B track. In that case, the A output is still turned on but the B output turns off (look down the third vertical column in the yellow grid in the above oscilloscope trace).
As the rotary encoder shaft is turned even further, neither the A brush nor the B brush touch teeth on their tracks. In that case, both the A output and B output turn off (the middle of the above oscilloscope trace).
As the rotary encoder shaft is turned even further still, the B brush makes contact with the next tooth on the B track, but the A brush has not yet done so. In that case, the B output turns on again, but the A output remains off (the fourth to the last vertical column of the oscilloscope trace).
Finally, as the rotary encoder shaft continues to be turned, the pattern repeats with both the A and B brushes making contact with teeth on their respective tracks. Both the A and B outputs turn on (the far right side of the above oscilloscope trace).
Zooming out a bit, we can see the repeating pattern...

Oscilloscope trace showing a repeated output pattern from a rotary encoder.
The printed pattern of teeth is what causes a repeating output pattern such as: A on / B on, A off / B on, A off / B off, A on / B off. If the dial is turned in the opposite direction, the pattern is reversed.
By keeping track of the output pattern, a microcontroller can determine the direction of the rotation by seeing if A turns off first or if B turns off first. By counting the number of pulses or counting the number 4-sequence patterns, the microcontroller can determine the amount that the knob has been turned.

Oscilloscope trace showing a repeated quadrature output pattern from a rotary encoder turned quickly.
Above is a picture of the repeating output pattern when I really cranked on the rotary encoder knob. By the way, the repeating pattern (A on / B on, A off / B on, A off / B off, A on / B off) is called quadrature encoding.

Oscilloscope trace of a switch bounce on a rotary encoder.
Besides directional information, a great advantage of quadrature encoding is that brief errors in a sensor are automatically corrected. In quadrature encoder, brief spikes or droops simply look like a brief forward or backward movement. Contrast that with a single-output pulse train where every electrical spike counts as an extra click.
For example:
			Normal: On On (0), On Off (+1), Off Off (+1), Off On (+1) = 3

			Glitch: On On (0), On Off (+1), On On [spike] (-1), On Off [spike ends] (+1), Off Off (+1), Off On (+1) = 3
Both sequences end in the same sensor state (off on) with the same total count (3). The glitch is simply read as dropping back and then moving forward again.
Quadrature encoding will not prevent errors due to noise if both sensors experience glitches at the same time. Noise resistance requires at least one sensor remain steady. But, since the sensors are supposed to take turns changing states, bounces and noise due to state changes are automatically ignored.
The rotary encoders that I purchased years ago have a problem.

Left: (good) Square pins secured through holes in the PCB. Right: (bad) Thin pins wrapped around a ceramic base.
New rotary encoders have an FR-4 or G10 laminate PCB with holes drilled through it for standard square pins. But, my old rotary encoders have a ceramic substrate that must have been too difficult to drill through. Instead, the manufacturer wrapped thin pins around the base.
This isn’t a problem if the entire rotary encoder is soldered onto a PCB, as the thin pins will be soldered on both ends and the thick metal shell of the encoder will be firmly affixed. But, if the rotary encoder is attached to the top of a project box with a nut, then the connecting wires can tug on the thin pins and rip them off during assembly or servicing.

Non-conductive epoxy secures the delicate pins in place on an older-model rotary encoder.
I didn’t want to waste the encoders that I had previously purchased. So, even though the solution seems primitive, I applied non-conductive epoxy to the pins, ceramic base, and wires to hold them in place.
If you ever need to perform this trick on an electrical part, be sure not to use epoxy with metal filler or other conductive ingredients. They will short the pins together -- ruining the electrical component. When in doubt, place a glob of epoxy on a sheet of cardboard and let it dry. Then measure the resistance with an ohmmeter. If should be infinite (at least greater than 10 megohm).
Don’t forget to let the epoxy cure completely (finish drying) before putting the part into use. The uncured epoxy may be conductive when it is in a paste or gel form.
It shouldn’t be too surprising that the output pattern used to encode the direction and amount of rotation on a rotary dial is the same output pattern used on a motor encoder. The primary difference is that motors tend to use optical sensors or magnets to generate the pattern since brushes would add resistance and wear out fairly quickly on a spinning motor.
Of course, if you absolutely needed to, you could attach a rotary encoder to the output shaft of a motor or wheel to count rotations. But, mechanical encoders are better suited for relatively slow moving or rarely changing applications.
The counter device uses the exact same subroutines to decipher the Adjust Dial rotary encoder as it does for deciphering the external sensors in quadrature mode. The code evolved quite a bit from when it was first written, because it turned out that regular reading (polling) of the input lines was far too slow. Details are on the next page...