

For entertainment purposes, I wanted to use Lego parts for the meter case, as shown on the previous page. Specifically, I thought it would be fun to have the electronic components being held and measured by Lego minifigures.
The Minifigure Multimeter project requires electrical connections between the electronic component being measured and the microcontroller on the meter’s circuit board. Because Legos are made out of non-conductive plastic, something metallic is needed to make an electrical connection. I briefly considered painting the minifig hands with a silver conductive pen (normally used to repair circuit traces), but I felt it would look better to retain the classic yellow hands. Therefore, the most direct approach was to insert bare wires into the hands.
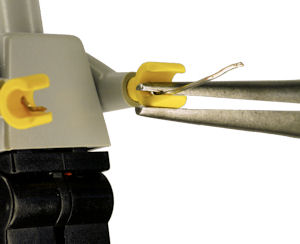
Wires in the minifig hands.
Here’s an exploded view of the minifig wiring:

Wiring through the minifigure body.
The wires run through the hands, through the arms, into the chest, down the legs, and through holes in the base plate covering the meter circuitry. The hand’s wires are solid (not stranded) 24 AWG with stripped insulation from the hand to the chest.
Due to space constraints and the lack of need to be durable, the other wires are 30 AWG magnet wire. The magnet wire may look bare, and it may look like it is making contact with other wires, leading to short circuits. However, the magnet wire has a coating that electrically insulates it. The coating burns off when soldered, so it is very easy to connect.
Critical threading tips:
There are four wires in total, because I also ran wires through the neck to supply power to a two-lead bicolor LED in the minifigure’s head. I chose a T1 LED (3 mm) size rather than the common larger T1¾ size that some evil mad scientists chose before me, so that the Lego neck would be retained. Either approach is valid -- but you'll get a wider choice of parts in the larger size.

T1 LED in the neck of Lego minifigure. (Lite-On LTL-14CHJ, part #160-1058 from Digi-Key).
Bicolor LEDs have two color chips inside them. This permits four different lighting effects:

Bicolor LED inside Lego minifigure head showing off, red, green, and yellow.
The standard opaque yellow minifig heads were replaced with transparent yellow or transparent green for the LED illumination to be visible. (You can find these on BrickLink.com by searching for “Trans-Yellow Minifig, Head”.) Face stickers were laser printed on transparent mailing address labels.

Lego minifig smiley face reproduced on transparent laser-printer sticker.
Before describing the meter circuitry, let’s see how the minifigure was machined to permit the wiring.