

Tiny motors are wonderful for driving little robots such as:
Another use for tiny motors is turning small parts (like sensors) on big robots.

Illustrated above, from left to right:
Electronic Goldmine has a number of pager motors with weights on their shafts: G13566 ($1.29), G16777 ($0.79), G16897 three assorted ($1.99).
BGMicro has a pager motor with a weight on its shaft: MOT1071 ($0.69).
Solarbotics sells tiny geared pager motors!! Geared motors are far superior to ordinary pager motors for robotics, since they have more torque (pushing power) and rotate more slowly. See the GM10 ($12) and GM15 ($19) in the Motors section of Solarbotics.
Before discarding a damaged or obsolete cell phone, pager, or force-feedback joystick (aka game controller), crack it open and recover the vibrating element!

Cell-phone vibrating motor with weight, tack-welded mounting clip, and two-pin connector.
The vibrating part usually consists of a miniature motor with an offset-weighted shaft. Because the piece of metal on the shaft is not centered, when the motor spins it causes the device to shift back-and-forth as the weight of the metal piece shifts around and around the motor shaft. Vibration.
The offset weight must be removed to make an effective robot motor.


Left: Motor shaft damaged during weight removal. Right: Another view of the damaged shaft. Also notice the nicks on the motor body.
My first attempt at removal was to use a cutting wheel. Then, I tried to use a grinding stone. Although I successfully removed the weight, the process was difficult and took a long time.
More significantly, the motor shaft got damaged. In the above photos, the shaft is nearly ground to half diameter. That’s not good!
Someone with greater skill and tool-accessory knowledge could probably perform the operation better than I could. The Dremel isn’t at fault.
Seriously, always wear goggles or protective eye wear when working with tools!
The metal attached to my cell-phone vibrating motors is extremely strong. It doesn’t appear to be made of lead or some other malleable element. The metal ended up dulling or damaging the heads of standard pliers and cutters. Even when I could get a grip, I ended up pulling out the entire shaft of the motor. That’s not good either!

Vise-Grip brand locking pliers
While attempting to get a better grip on the motor, I accidentally discovered a reliable, repeatable, and easy way to remove the metal weight. Simply applying the locking force of locking pliers to the weight seems to crush or deform the metal very slightly, but enough to pop the crimp.
Unless you’ve got super powers, normal pliers won’t work. The leveraged force of locking pliers is absolutely necessary.
Grip the metal weight at the end of the locking pliers like popping off a beer cap with your molars. (The American Dental Association would like to point out that the prior sentence is very reckless and is likely to result in the enrichment of your local dental specialist.)

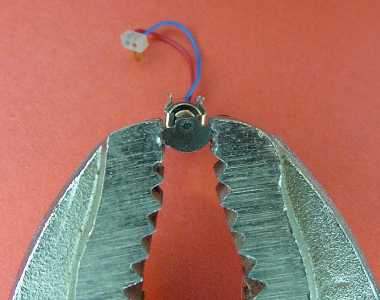
Left: Locking pliers, front view. Right: Locking pliers, side view
Try to grip across only the crimped portion of the metal weight, so that it can squish out rather than crimp further. The motor body shouldn’t be touching the pliers at all.
Use the greatest squeezing force the pliers can reasonably apply. The more the initial resistance to the squeeze, the easier it is to remove the motor shaft. When positioned and squeezed just right, I barely had to tug on the motor body to pull the shaft from the weight.
Use only your hand to pull on the motor body. No other pliers or tools should be necessary.
The washers and shaft remain intact and straight. The motor is unblemished and undamaged.

It’s hard to tell, but the hole in the metal weight seems a little bit oval after removal. As with some of the other pictures on this page, click on it to see a larger view.
You’re not convinced? Oh sure, it looks easy. But does it really work?


Left: One hundred tiny motors, ready for robots. Right: One hundred tiny weight, ready for proper disposal.
I separated over 100 offset weights from miniature motors in less than an hour. My hands are a little raw, but no shafts got bent or pulled in the entire lot.
By weighing the parts, I determined each motor weighed about 2 grams initially, but only 1.2 grams without the metal offset weight. A 40% savings. For those of you without an internal sense of metric, 100 finished motors weigh only 4.3 ounces.
Because dissimilar metals expand and contract at different rates, it is possible to take advantage of those properties to cause friction-fit objects to loosen up. Normally, I would expect cold, dry conditions to loosen metals.
I found that by heating the half-cylinder vibration component on the end of the motor, it becomes a lot easier to remove. I had the motor in a vise with the semicircle-thing sticking out the top. Then I heated and pulled with a pair of pliers and it just slid off.
Probably the best way to remove a gear, wheel, or weight from a shaft is to use a tool specifically designed to do the job -- a gear puller. I purchased #82392 from MicroMark for $7.35.
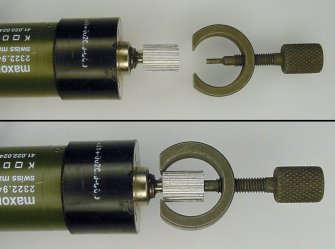
Top: Motor with gear and the gear puller tool. Bottom: Removing gear by turning screw.
The gear, wheel, or weight needs to be wide enough to be gripped and thin enough to fit inside the semicircle of the tool. Also, there must be a wide enough opening such that the puller tool’s screw tip can reach in and press against the motor shaft. Then, when the screw is turned, it presses against the motor shaft and pulls off the attached object.
Unfortunately, most pager motor weights either lack an opening or the pager motor shaft diameter is too narrow to fit the screw tip of commercial off-the-shelf gear puller tools.
Depending on your access to precision machine tools (like a lathe and a milling machine), it may be possible for you to make a custom gear puller. If not, then a slightly more crude method can produce similar results.

Partially-slitted metal sheet (1) and example rods (2) to remove a gear from a motor shaft.
Find the thickest piece of flat stock metal sheet (can be from a junk drawer) that will fit between the end of the motor and the gear or other object you want to remove. Saw or cut a slit part of the way through the metal sheet. See item (1) in above picture. The slit should be wide enough that the motor shaft can be slid on, leaving the gear on one side of the sheet and the motor on the other side of the sheet.
Then, find a rod (like from a consumed Dremel grinding bit) or make a punch tool that can fit through the object to make contact with the motor shaft. See item (2) in the above picture.

Tapping the rod with a hammer to force the motor shaft free from a gear.
Place this setup on a vise or something similar to support the metal sheet. With the rod making contact with the motor shaft, gently tap the rod with a hammer. This should force the motor shaft out of the gear. At some point, the motor will fall to the floor. Be sure to put a blanket or something there to catch the motor.
Better still, if you have an arbor press, you can use the same tools to ease the motor free, rather than tapping on it with a hammer.