

Previously, I created a layout for a secure Lego coupler. Each coupler is shaped as a solid cylinder that is 22 millimeters in diameter and 14 millimeters thick. Let’s start by machining the cylinders on a lathe.
The nearest diameter I could find in a raw material is a PVC Type II plastic solid rod that is 1 inch (25.4 millimeters) in diameter from McMaster-Carr (#87025K39). PVC has excellent machinability and type II improves on that with excellent impact strength.
In order to build two robots with two motors each, I need four couplers. It would be nice to have a third robot that I can fix while the other two are operating. So, six couplers would be desirable. So, that means I need to make eight couplers, because mistakes will be made during machining.
Long rods wiggle out of the lathe chuck during machining due to torque. To hold a long rod in a lathe, you need to drill a short hole in the end with a 60 degree center drill (Little Machine Shop #2990) and insert a center to hold the end of the rod securely.

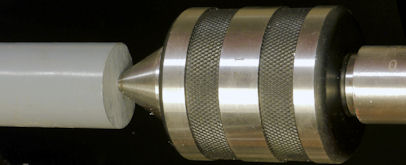
Left: Drilling end with 60 degree center drill to stabilize rod on lathe. Right: Live center holds long rod
A dead center doesn’t spin; a live center rotates smoothly on ball bearings. To avoid having the end of the PVC plastic rod melt due to friction, I selected a live center. The disadvantages are that live centers are more expensive (well, I already bought it) and are bulkier (more difficult for the cutting tool to reach the end of the rod during machining).
The first operation is to decrease the diameter of the rod by feeding the cutting tool across the rod while the rod rotates. With each pass, the cutting tool can be moved closer to the desired diameter of the rod.

Turning rod from one inch diameter to 22 millimeters
Below, notice how the rod is held on both ends, by the lathe chuck and live center. That is how it was held when machining the outer diameter as well.
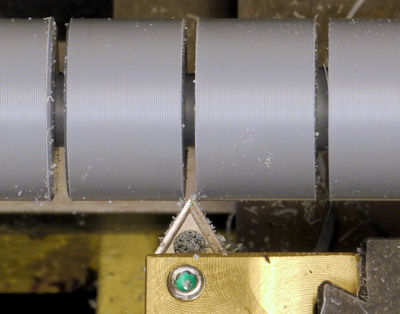
Next, the rod is partitioned into 14 millimeter segments using a cut-off blade, leaving the very center intact. In hindsight, this was not a good approach as I have no idea how the final cuts were going to be made while the rod was being held on both ends.

Partitioning rod using cut off tool on a lathe
After segmenting, but before separating, I took the optional step of chamfering so that the plastic edges wouldn’t cause the piece to sit askew in the milling machine.
Chamfering edges of cylinders on lathe
At this point I tried to use the cut-off blade to split the rod. The first segment worked. The next one jammed and marred due to lack of support on the far end.
Before continuing, I cut off the most supported end and concentrated on that. I need to drill a center hole in one of the cylinders to act as a guide for centering the milling machine later on. So, this special cylinder gets a 4 mm hole before being cut off with the cut-off blade.

Drilling a 4 mm center hole in one cylinder on a lathe to center mill
The remainder of the rod (containing partially-cut segments at this point) was inserted into the lathe chuck and the nearest segment was cut off. This process was repeated until all the segments were separated.
The cut-off blade often leaves a small piece uncut as the rod breaks free. A simple facing operation is performed where the cutting tool is moved in towards the small protrusion as the cylinder spins in the lathe. This produces a nice clean flat face.

Facing on a lathe to remove center bump
Despite a few missteps, I now have eight perfectly-sized PVC cylinders ready for the next step in machining.
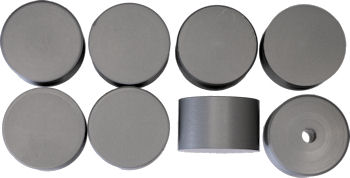
PVC cylinders ready to machine into motor couplers
One of the cylinders has a hole drilled in the center to help the milling machine, as we will soon see.
Speaking of milling machines, you can make these cylinders almost as easily on a milling machine. You’d begin by cutting the rod into roughly oversized cylinders with a hacksaw. Then, put a cylinder into a vise with a V-groove and square off the top. Flip it over and square off the bottom to the final height of 14 centimeters.