The Back And Forth robot drives forward and reverse based on switch presses to a motor driver circuit. The circuit provides power to a tiny gearmotor. I need to attach a tiny wheel to the tiny gearmotor to move the robot.
It was fun for me to create a small robot. But, counter-intuitively, small robots are much more difficult to make than lunch-box size robots. If you aren’t comfortable machining, then I recommend using the circuit from this robot combined with the no-machining body of the original Flip-Flop robot.
Okay. Back to the issue of attaching wheels to gearmotors. Lego makes some wonderful wheels in small sizes. Unfortunately, the wheel hubs have shaft slots designed to mate with Lego plates, not commercial gearmotors.
When experimenting with ShapeLock, I realized I could fill in Lego pieces with plastic. The plastic melts at low temperatures, so it is safe to use. And, the plastic bonds nicely to ABS, which is the type of thermoplastic of which most Lego pieces are made.

Left-to-right: Original Lego wheel hub, partially filled, overfilled, and the finished piece drilled (showing completeness of the fill on the opposite side).
I began by pulling off the black rubber tire from a small Lego wheel. Using wire snips, ShapeLock beads were cut into itty-bitty pieces and melted on a silicone cooking tray at 170 °F in a home oven. When the plastic bits turned clear, I dropped them into the center of the Lego hub, and jammed them into the crevices with a stainless steel rod and tip of a push-pin.
At first, I was going to use the hub as-is with the layers of melted plastic. But, I was concerned that the tiny layers didn’t seem fused together, as they had cooled independently as I dropped in each bit. Hesitantly, I placed the Lego hub itself (with the inserted plastic) into the oven to melt everything together. Surprisingly, the Lego plastic didn’t melt at that temperature, and the ShapeLock plastic congealed and flowed as desired.
Eventually, I ended up with a fully-filled Lego hub with a slight overflow.
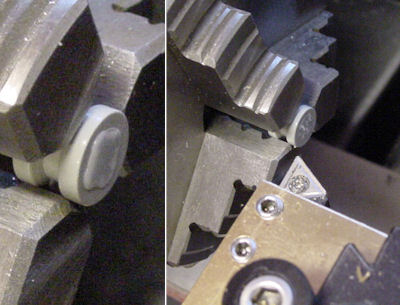
Facing off excess plastic in a lathe.
Using a lathe, the excess plastic can be removed with a facing operation.
The ShapeLock plastic is slippery, stringy, and has such a low melting point that it can deform due to the heat caused by friction during machining. In other words, it isn’t easy to machine accurately and cleanly.
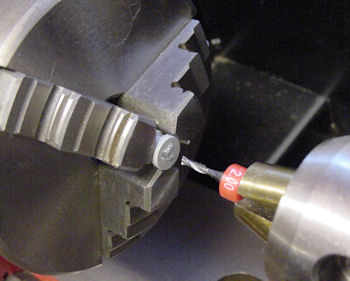
Milling hole in ShapeLock plastic rather than drilling.
Rather than use a long flexible 2 mm diameter drill, which has a high likelihood of walking and bending, I switched to a stubby 2 mm diameter end mill for drilling the relatively short motor shaft hole. It works okay.
Despite my complaints about trying to machine ShapeLock, the plastic expands enough after being cut that it grabs tightly to the motor shaft. As such, I didn’t even need to add a set screw to hold the wheel to the motor. (Of course, this is acceptable only because the forces are so weak on such a small robot that the wheel won’t get pulled off.)
Although the Back-And-Forth robot needs only one motor for driving forward and backward, it still needs some glide pads or additional wheels to stay upright. For good looks and smooth driving, I decided to attach a pair of Lego wheels to the opposite side of the robot.
Lego produces a nice plate piece that connects to a pair of wheels. This makes it convenient to build the front or rear axles of small cars. But, I wanted the wheels individually on the same side of the robot, at the back and the front.
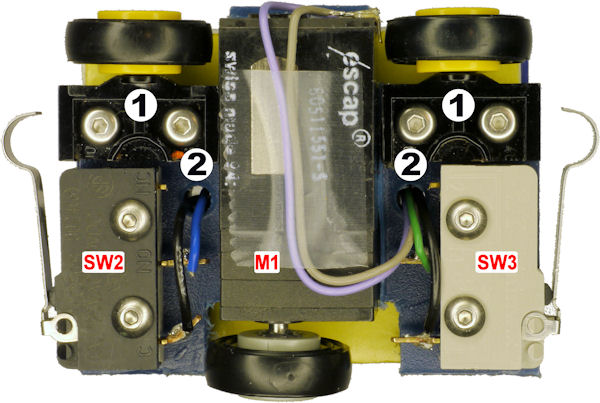
Free rolling wheels ① on one side.
Since I couldn’t locate a one-sided axle plate, I decided to split a dual-sided plate in half.
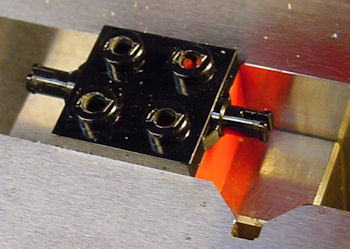
Lego wheel plate with studs drilled for #2-56 screws.
Before splitting the piece, I drilled holes in the studs for #2-56 size screws. The plate rests on a standard 2x2 red square piece during drilling because:
My smallest end mill is a delicate 1 mm. If I cut the plate in half, then 1 mm of middle material will be lost. If that much material compromised the integrity of the plate, I could cut up two plates, with each having a “good half” that is retained and a “bad half” that is discarded.
My thinnest miniature table saw blade is 0.02 inches, which is about half a millimeter. I figured that’s a small enough loss of material to avoid destroying a second plate from my sons’ Lego car collection.
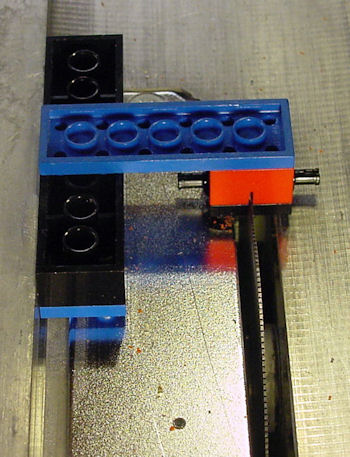
Table saw Lego jig cutting a slit in a Lego wheel plate.
To cut a straight line with my fingers out of the way, I built a small jig out of Lego pieces. The long Lego brick slides against the rip fence.
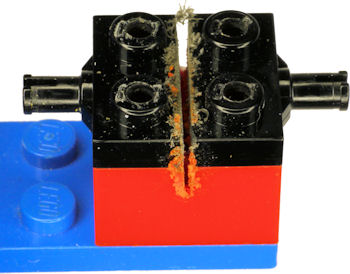
Split plate well centered but a bit deeper than necessary.
The wheel-plate divided beautifully. A nice straight line down the center, without critical loss of material. And, it sure took a lot less time than machining my own shaft and bearing.
Finally, to end the article, let’s look at the machining of the base plate and solderless breadboard.