(continued from previous page)
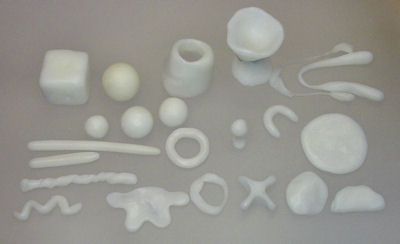
Here are some things made when experimenting with hobbyist-friendly ShapeLock polycaprolactone (PCL) plastic.

Cubes, balls, rods, cups, and other shapes made with ShapeLock plastic.
My sons and I applied our well-worn Play-Doh skills to make various shapes. As the Far Side once recounted “Making snakes are a cinch!”.
The balls, rods, cubes, and other shapes are all handmade, and therefore imprecise. However, this would be a quick way to create raw stock in the approximate size, before machining to the finished dimensions.
Since this was my first exposure to low-temperature-melting plastic, I didn’t spend a lot of time trying to make perfect or attractive objects. Instead, I just wanted to see what it was like to work with. Therefore, don’t dismiss the material simply because of the crudeness of my rough samples.
Potentiometers rarely come with mating dials. I wanted to see if I could form a dial from ShapeLock.

Homemade potentiometer dial with D shape formed in plastic.
On the positive side, the plastic forms a decent “D” shape that mates with the flat on the shaft of the potentiometer. And, the plastic retains an acceptable friction fit, even when the material cools. When the dial is turned, the potentiometer turns, without the dial being loose or falling off. Furthermore, the dial is non-toxic, waterproof, can be shaped to fit unique applications, and can be painted.
On the downside, I wasn’t paying attention and the potentiometer drooped as the plastic solidified, causing the dial to be angled. Also, the plastic is slippery, which might not be the appropriate substance when trying to retain a grip.
A consistent theme at the Robot Room is finding new ways of connecting a commercial miniature DC motor to a Lego wheel or gear. The ShapeLock prototyping plastic is an entirely novel medium -- with its shape matching and material bonding capabilities.

Lego cross-axle coupler. Right: ShapeLock doesn’t bond with polypropylene.
The first thing I tried was a coupler like in my popular Sandwich robot. It works pretty well!
ShapeLock doesn’t chemically bond with the plastic used for the Lego cross axle (polypropylene). That means that the end of the cross axle should be notched (see Chapter 20 of Robot Building For Beginners, Second Edition or Chapter 4 of Intermediate Robot Building) in order to stay connected to the coupler body. But, it also means that excess strands can be picked off the cross axle using a razor blade, which is beneficial.
The coupler needs a screw to hold it securely to the motor shaft. This could be added using a drill and tap. However, with some ingenuity, the ShapeLock material could be molded around a screw while forming the coupler, so that no additional machining would be required.
The big problem with hand forming a coupler is that the Lego cross axle doesn’t align perfectly with the motor shaft. Misalignment isn’t a huge issue for fat squishy tires, but it would be too imprecise for connecting to Lego gears. The next two couplers attempt to reduce the severity of misalignment.

Another motor coupler, this time using an axle connector.
In this example, the motor shaft is inserted into a Lego cross-axle connector. The ShapeLock plastic is used to fill the space between the motor shaft and the Lego connector. Additional plastic on the outside of the coupler provides material for a setscrew to be attached.
This technique improves the alignment of the motor shaft and the cross axle, but it only works for motor shafts that fit snuggly inside of a Lego connector.

Try to avoid plastic bubble blister.
One of the difficulties encountered with this low-temperature plastic is that the working time is short and the material is consistency is not runny enough to fill voids and release bubbles. As such, you can end up with errors due to bubbles if you aren’t careful. In the above example, a large blister reaches all the way to the motor shaft and Lego axle, weakening the coupler at that location.
The above photograph also makes it clear how large the hand-formed coupler is compared to the motor. It almost defeats the purpose of having a small motor.

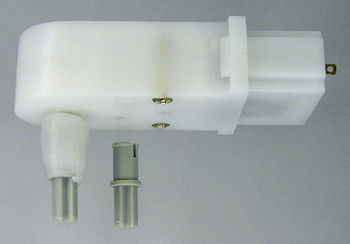
Solarbotics motor Lego coupler with ShapeLock plastic.
Nearly all of the Lego couplers that I’ve machined also suffer from being fairly long. With moldable plastic, I can now create a stubby little connector. Like the previous example, the plastic fills the inside of the Lego piece, as well as provides a thick, rigid outer shell. With a lathe or a mold, this could clean up nicely.
The Solarbotics motor is inexpensive and has a form factor for laying parallel side-by-side with another motor. With the ShapeLock-Lego coupler, a fairly narrow robot can be made.
Most LEDs (light-emitting diodes) currently on the market have clear lenses with light directed forward. Device designers aim the LEDs through acrylic shapes, called “light pipes”, to provide attractive indicators. This provides a wide variety of shapes and outputs, if you can afford custom acrylic molds or can machine and polish them yourself. This is too much effort for most hobbyists.
I wondered whether a similar effect could be had with ShapeLock plastic.

ShapeLock molded onto LEDs to diffuse illumination. But it isn’t really a light pipe.
A moderately thin layer of ShapeLock plastic is effective at redirecting and diffusing the light. This is faster and easier than other methods, such as sanding, when a diffused-lens LED is not available from a manufacturer.
Unfortunately, the light does not follow unusually shaped material to the same extent as a carefully designed acrylic light pipe. And, as would be expected, thicker shapes are not illuminated very well.
The other concern is heat dissipation. Plastic is a thermal insulator, so an LED probably should not be driven to its maximum current level, unless an alternate heat sink (perhaps attached to the leads) is applied.
A possible use for the ShapeLock plastic is to fill a hollow structure for improved rigidity or to solidify walls to connect pieces via screws or other fasteners.

ShapeLock bonds to ABS plastic, filling in this Lego block.
In this test, molten ShapeLock plastic was forced by hand into a 2x2 Lego brick. There have been a number of occasions as a robot builder that I would have liked to have solid Legos for attaching parts. The plastic works well for this purpose -- I'll need to remember this trick in the future. (In fact, I used it on the hubs of the Back-And-Forth robot.)
The ShapeLock plastic bonds with ABS, which is what most Lego bricks are made of. This is positive, as it will be retained inside or on most Lego parts. However, it also means that I have to be less sloppy, as the outside of my test brick is now coated unevenly with plastic drips. It might be possible to coat the outside of the block with a light oil, to prevent sticking. Or, better still, use masking tape.
This brings up the question of what common materials ShapeLock plastic bonds with; a topic explored on the next page.