(continued from previous page)
Although this article focuses on replacing a candle with LEDs for Halloween pumpkins, these LED circuits are applicable to any electronic project or device.
Before we look at the first LED schematic, let’s determine the appropriate power source and maximum power usage for a pumpkin candle replacement.
It is possible to use a wall wart AC adapter to cheaply power the pumpkin LED lighting. However, the cords may present a trip hazard on a dark Halloween evening. It is also possible, although unlikely, that an exposed connection or wire might also pose an electrocution hazard in rainy or wet conditions. Therefore, for the purposes of this science project, we’re going to stay away from electrical outlets.
Standard 9 volt alkaline batteries are readily available, relatively affordable, and compact. Except under bizarre circumstances, they don’t pose an electricution hazard. A 9V battery fits nicely in a pumpkin. Therefore, a 9V battery will be the power source for the LED pumpkin lights.
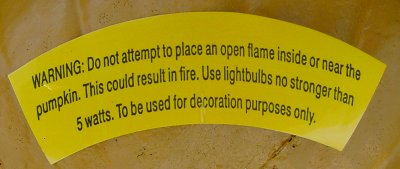
The label on the Funkins artificial pumpkin states that candles can’t be used, due to the risk of fire. Polyurethane releases nasty toxic gases when burned, so you really don’t want to put a candle in there.

Warning label on Funkin artificial pumpkin.
The final sentence on the warning label is pretty funny. “To be used for decoration purposes only.” I racked my brain trying to come up with the other possible uses for an artificial pumpkin. Floatation device? Soccer ball? Have people tried to make a pie out of it? (Mmmm, chewy.)
I tested the temperature of a single, unenclosed candle at 10 cm directly above the flame. The temperature was 180 Fahrenheit!
In past Halloweens, you may have noticed the browning of the top of a naturally moist pumpkin. You can imagine how dangerous it would be to put a candle in a dry, flammable, enclosed space like an artificial pumpkin. Don’t do it!
Surprisingly, candles are inefficient light sources (0.3 lumens per watt). That is, candles produce far more heat than light.
The much maligned incandescent bulb (15 lm/w) is 50 times more efficient of a light-source than a candle. Depending on whom you believe, an average white LED is approximately 100 times as efficient (30 lm/w) than a candle.
The Funkins manufacturer states that a lightbulb up to 5W is acceptable. Unfortunately, we can’t simply double that wattage for the efficiency gains of an LED over a lightbulb.
Here’s why: LEDs release most of their waste energy as heat (80%), whereas incandescent bulbs release most waste energy as infrared (73%) and only some as heat (19%). I’m not going to bother to attempt to calculate how much of the infrared energy is absorbed by the pumpkin and turned into heat. To be on the safe side, I am going to assume the artificial pumpkin is safe from the heat of an LED light source of up to 1.19 watts of power (19%/80% * 5W).
By choosing a relatively small amount of power usage, the temperature in the artificial and real pumpkins will be much lower than when using a candle. Furthermore, if we keep the circuit below 0.9 watts, the standard alkaline battery capacity (540 mAh) should last for at least 5 hours.
0.9W / 9V = 0.1 A = 100 mA540 mAh / 100 mA = 5.4 hoursDepending on your background and tenacity, the remainder of this web article will provide enough content for most people to make the LED candles. However, for the sake of brevity, this web article doesn’t provide deep dives on batteries, resistors, LEDs, multimeters, and solderless breadboards.
In my book, Robot Building for Beginners, I assume you know nothing about electronics. Chapters 7 through 13 provide step-by-step instructions and explanations as to how to build an LED circuit, test it, and modify it.
After reading this article, if you’re interested in building the circuits but need a bit more help coming up to speed on electronics, buy the book.
To begin, let’s start with a single LED.

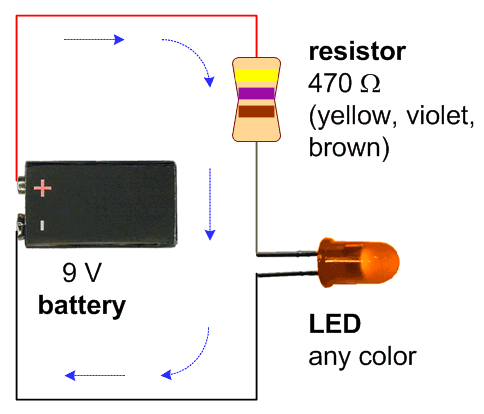
An LED schematic with a 9V battery, 470 ohm resistor, and a single LED of any color.
Conventional electricity flows from the positive terminal of the battery, through the resistor, through the LED, and then back into the other terminal of the battery. If you put the battery or LED in backwards, the circuit won’t work. (Resistors can be installed in either direction.)
The amount of light produced by an LED is controlled by the resistor. The more light produced, the more energy consumed and the more heat is generated.
Although a few LEDs come with built-in resistors, most manufacturers leave off the resistor so that the circuit designer can select a brightness and energy consumption rate appropriate for their project. While you may grumble at having to select, purchase, and add a resistor to your circuit, you’d be unhappier if you had no control over the LED’s luminance.
Some beginners in electronics try to attach an LED directly to a battery without using a resistor. In most cases, the LED will be instantly destroyed by too much energy. So, always use a resistor.
Electronics experts can pull a few tricks to use an LED without an obvious resistor by using a weak power source (like a lithium watch battery), by powering the LEDs from a semiconductor chip, or by matching the battery voltage exactly to the LED voltage usage. But, generally speaking, if you hook up an LED directly to a 9 volt alkaline battery, the LED will be permanently damaged.
I selected a resistor value of 470 ohms for this circuit so that any color LED could be used without risk of damage. However, in exchange for safety, the resistor value is not optimized for the brightest output for all LED colors.
There are five ways you can put together this electronic circuit:
For this article, we'll be using method #3, because solderless breadboards are the easiest to use. Also, this allows you to quickly experiment with your own arrangements.
A small solderless prototyping board is available from Electronix Express, part #03MB101, for $2.70. A RadioShack store may have a comparable board (part #276-175 for $4.49), however, they seem to be getting out of the electronic parts business.
For all of the simple Pumpkin LED candle projects, you'll also need:
If you’re lucky, these items will be available at your local Radio Shack. But, if you want to save some money and have a better selection, check out online stores such as Electronix Express, DigiKey, Mouser Electronics, or Jameco Electronics.

A simple LED circuit implemented on a solderless breadboard.
Look at the holes on the prototyping breadboard in the photo above. Connect the wires and component leads to the same locations on your breadboard. If your LED doesn’t light up:
At this point, you have a nice test circuit for checking the color and orientation of any LED. (It’s not quite as fancy as the LED Tester, but it will do.)
However, a single LED isn’t bright enough to light up a whole pumpkin. Let’s see how to add additional LEDs...